Janelle Kung
Video Editor + Motion Graphics Designer
LinkedIn Learning Projects
This section documents my ongoing experiments with new motion graphics, animation, and post-production techniques that come from LinkedIn Learning courses that I get certified in. Each project combines technical skill-building with a personal twist, whether reinterpreting a childhood cartoon, testing new animation methods, or practicing advanced compositing. For now, it’s a small but growing collection, designed to further my post-production tool kit.
Introduction to 3D
By Ian Robinson, Motion Graphics Educator
Course: Covered the core 3D features in After Effects, including 3D layers, cameras, lighting, and basic Cinema 4D integration.
Blog: Since I’m fluent in Illustrator and regularly create my own assets (icons, illustrated characters, and custom graphics), I decided to push myself further and learn Blender as well. The learning curve was steep at first. It was a challenge to navigate the Blender interface, build and manipulate meshes, and add materials and color. However, once the fundamentals clicked, it became genuinely fun, almost like a more advanced, creative version of Minecraft. Now, I feel comfortable creating my own 3D assets from scratch.
For my project, I built a home office setup inspired by my own hybrid workspace with a desk, computer, notepad, pen, eraser, and mug. Throughout my career I’ve worked both in-person and remotely, especially during COVID, and recently I’ve been reflecting on how much intentional setup contributes to staying productive and collaborative at home, like creating a dedicated space, staying organized, and communicating clearly through virtual tools. This animation is a small homage to that.
The first part of the piece features the 3D model snapping together with on-screen text and icons about working from home. The second part shows screen captures of the Blender model itself. I’m excited to keep building these new skills.
Tools/Techniques: Blender, After Effects, and Illustrator, 3D Modeling

Basics of 3D in After Effects
By Mark Christiansen, Educator at School of Motion
Course: Covered foundational concepts of Adobe After Effects, including core terminology of motion design, building compositions, and, introductory 3D design, and rendering.
Blog:
I wanted to create something that felt personal, so I centered my project around Lunar New Year. A lot of modern motion graphics are showcased on mobile devices, so I thought it would be interesting to design with that context in mind. I combined footage of an East Asian woman in traditional red using her phone and built a 3D phone to integrate into the scene.
On the phone screen, I designed a rotating interface styled like an app, displaying “Lunar New Year 2026” along with culturally relevant tasks like giving red envelopes and cleaning the house for good luck. This project was my first time combining 3D elements with UI-style motion, and it pushed me to think about how graphics live within real-world contexts.
Tools/Techniques: 3D Layers and Extrusion, Compositing, Trim Paths, Sound Design
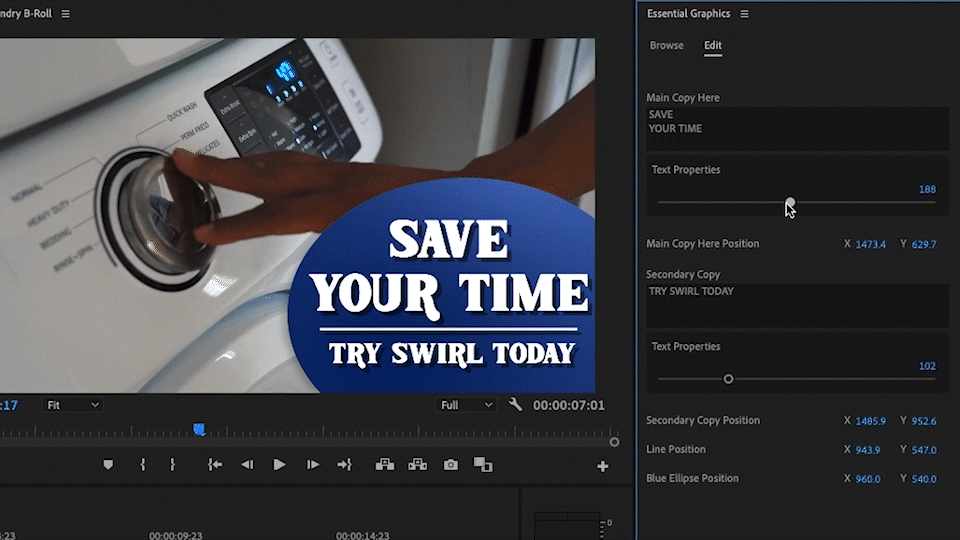
Creating AE Templates
By Nick Harauz, Adobe, Apple, and Avid Trainer
Course: Covered how to automate motion graphics workflows by building procedural After Effects templates through the Essential Graphics panel.
Blog: I created a mock-up brand called Swirl: a fictional laundry service app that connects people who need laundry done with those who have time to do it. Since a business like this would require scalable and consistent branded content, I built a motion graphics templates (MOGRT) that allow teams to easily update text, position, and motion elements for social media videos across platforms like Instagram, Meta, and YouTube.
I designed a rotating blue gradient inspired by a washing machine cycle and integrated text animation for a clean look. This project reflected my understanding of scalability in creative workflows by building animation that is not just for a one-time use, but a tool that is adaptable and can be used by the entire team. Earlier in my career, I was one of the team members that worked with MOGRTs (given to me by our senior producer) to generate hundreds of branded end cards and now I can create my own MOGRTs, which feels very full circle.
Tools/Techniques: Motion Graphics Template (MOGRT), Tracking Text, Line Trim Paths, 4-Color Gradient

Animating Infographics
By Ian Robinson, Motion Graphics Educator
Course: Covered techniques for animating infographic elements in After Effects, including working with shape layers, layer masks, text animators, expressions to link animations, and integrating 3D layers and Cinema 4D.
Blog: I approached the statistic about 26% of American teenagers (from the Cyberbullying Research Center, 2023) creatively. Rather than use a traditional pie chart, I visually represented the fact that roughly 1 in 4 homes have a child who has experienced cyberbullying. I used 3D layers for the first time, navigating the z-axis, a camera that moves, and strategically placed spotlights. I emphasized sound design by adding a eerie buzzing and an uneasy water pour sound effect to make the statistic feel off-outting. This project helped me gain confidence working in 3D space and integrating sound to support the narrative.
Tools/Techniques: 3D Layers, Active Camera, Spot Lights, Track Mattes, Typewriter, Dimension (Glow and Shadow), Noise, Sound Design
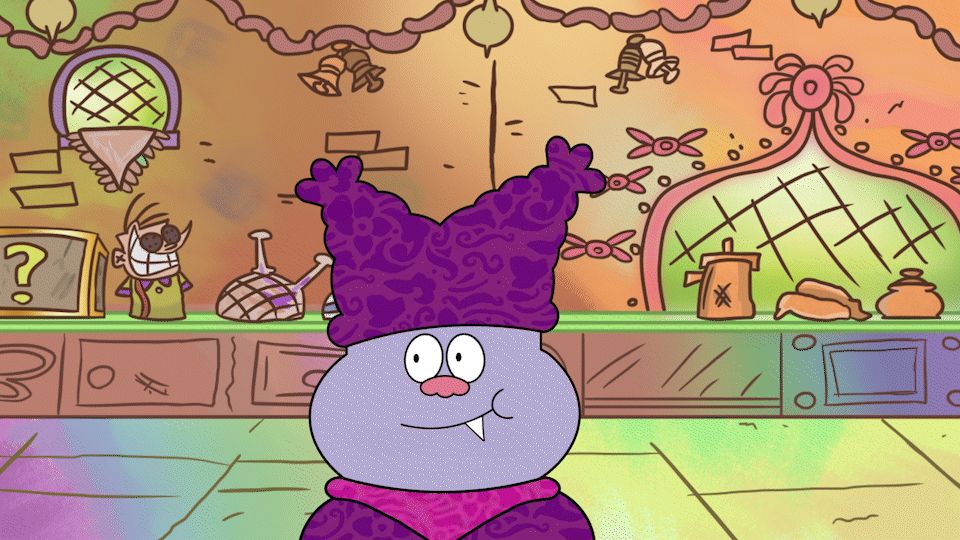
Character Animation Training
By Alan Demafiles, Freelance Motion Designer
Course: Covered essential tools and techniques for character animation in After Effects, including rigging with puppet tools and expressions, working in the graph editor, and adding 3D layers and cameras.
Blog: I recreated Chowder, one of my favorite childhood cartoon characters that I used to watch every week on a tiny TV at a Chinatown diner. Reinterpreting him was both nostalgic and a rewarding technical challenge. I usually illustrate without Strokes, which makes animation trickier, but for this project I used Track Mattes to bring his clothing patterns to life, mimicking the dynamic textures from the original show. Additionally, I used Toggle Hold Keyframes for the first time to switch between the 13 different mouths that I drew, leaving with a greater understanding of how to bring 2D characters to life.
Tools/Techniques: Track Mattes, Toggle Hold Keyframes, Stroke